Paint Your Front Door for a Quick Style Refresh: Transforming your home’s exterior is easier than you think! A fresh coat of paint on your front door can dramatically enhance your curb appeal, adding personality and value to your property. This guide will walk you through the process, from choosing the perfect color to applying the final touches, ensuring a professional-looking result that you’ll be proud of. We’ll explore various paint choices, preparation techniques, and helpful tips to make your project a success.
From selecting a color that complements your home’s architectural style to mastering painting techniques and choosing the right hardware, this comprehensive guide covers every aspect of the project. We’ll delve into the psychology of color, providing insights into how different hues can impact your home’s overall aesthetic and the impression it creates on visitors. Furthermore, we’ll offer budgeting advice and explore different paint types to help you make informed decisions throughout the process.
Choosing the Right Paint Color
Selecting the perfect paint color for your front door is a crucial step in achieving a stylish and welcoming exterior. The color you choose significantly impacts your home’s curb appeal and creates the first impression for visitors. Consider the overall style of your home, the surrounding landscape, and the psychological impact of different colors when making your decision.
The Impact of Color Families on Curb Appeal
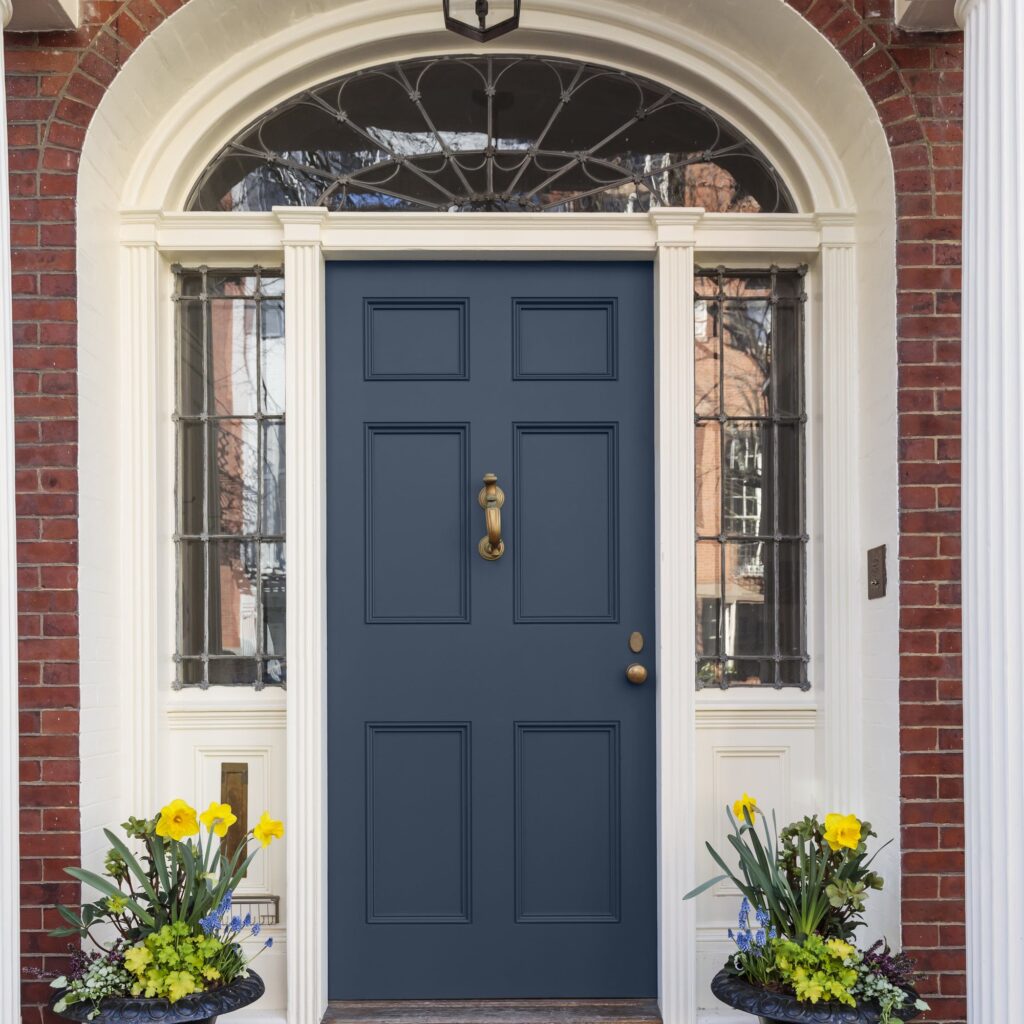
Warm colors, such as reds, oranges, and yellows, exude warmth and energy, creating a vibrant and inviting atmosphere. They tend to draw the eye and make a bold statement. Cool colors, including blues, greens, and purples, project a sense of calm and serenity, often creating a more sophisticated and understated look. Neutral colors, like grays, beiges, and whites, offer versatility and timelessness, allowing them to complement a wide range of architectural styles and landscaping. The choice between these families will largely depend on the desired mood and the overall aesthetic you aim to achieve. For instance, a sunny yellow door might be perfect for a cottage-style home in a bright, floral garden, while a deep navy blue would complement a stately Victorian home nestled among mature trees.
Paint Colors to Complement Architectural Styles
The best paint color for your front door will also depend on your home’s architectural style. Certain colors naturally harmonize with specific architectural features and create a cohesive visual appeal.
| Architectural Style | Suggested Paint Colors | Effect |
|---|---|---|
| Victorian | Deep reds, emerald green, charcoal gray | Enhances the richness and detail of Victorian architecture, creating a classic and elegant look. |
| Ranch | Warm browns, sage green, muted blues | Complements the casual and relaxed atmosphere of Ranch-style homes, creating a sense of understated elegance. |
| Colonial | Black, navy blue, classic white | Emphasizes the traditional and stately character of Colonial homes, creating a timeless and sophisticated appearance. |
| Craftsman | Deep greens, browns, or a warm, earthy red | Highlights the natural and handcrafted elements of Craftsman homes, creating a feeling of warmth and connection to nature. |
Psychological Effects of Paint Colors
Different colors evoke various psychological responses. Red, for example, is often associated with energy, excitement, and even aggression. A red door can be a bold statement, signifying a welcoming yet powerful presence. Blue, on the other hand, is frequently linked to calmness, tranquility, and trust. A blue door can project a sense of peace and reliability. Green represents nature, growth, and harmony, creating a feeling of serenity and connection to the outdoors. Neutral colors like gray and beige offer a sense of sophistication and understated elegance, providing a clean and timeless aesthetic. Understanding these psychological associations can help you choose a color that reflects your personality and creates the desired atmosphere for your home. For instance, a family home might benefit from a welcoming, warm-toned door, while a more formal residence might be better suited to a cool, sophisticated hue.
Preparing the Door for Painting
Proper preparation is key to achieving a professional-looking finish when painting your front door. A well-prepared surface ensures the paint adheres properly, resulting in a durable and attractive outcome that lasts for years. Neglecting this crucial step can lead to peeling, chipping, and an overall unsatisfactory result. Take your time with this phase; it’s an investment in the longevity of your paint job.
Thorough cleaning and surface repair are essential before applying any primer or paint. This process removes dirt, grime, and any loose or flaking paint, creating a clean, smooth surface for optimal adhesion. Addressing imperfections like dents and scratches prevents them from showing through the new paint, ensuring a flawless finish.
Surface Cleaning and Preparation
Before you begin painting, it’s crucial to thoroughly clean your door to remove any dirt, grease, mildew, or loose paint. This ensures proper adhesion of the primer and paint, leading to a longer-lasting and more attractive finish. A clean surface also allows you to properly assess the condition of the door and identify areas needing repair.
- Begin by washing the door with a solution of warm water and mild dish soap. Use a soft-bristled brush or sponge to scrub the entire surface, paying attention to crevices and areas where dirt tends to accumulate.
- Rinse the door thoroughly with clean water and allow it to dry completely before proceeding. Ensure all soap residue is removed, as this can interfere with paint adhesion.
- Once dry, inspect the door carefully for any loose paint, peeling areas, or imperfections. Use a scraper or putty knife to remove any loose paint or debris. Sand any rough areas smooth using fine-grit sandpaper.
- After cleaning and scraping, wipe down the door again with a tack cloth or slightly damp cloth to remove any dust or debris created during the cleaning process. This ensures a clean surface for priming.
Repairing Surface Imperfections
Addressing imperfections before painting is crucial for a professional-looking finish. Small dents and scratches can be easily repaired, preventing them from being visible under the new paint. Larger imperfections may require more extensive repair techniques.
- For small dents, use a wood filler to fill the imperfections. Apply the filler according to the manufacturer’s instructions, ensuring it is level with the surrounding surface. Once dry, sand the filled area smooth with fine-grit sandpaper.
- Scratches can be filled with wood filler or touched up with paint that matches the existing door color. For deeper scratches, consider using a wood stain to match the surrounding wood grain before filling and sanding.
- For larger damage, such as significant dents or cracks, professional repair may be necessary. A carpenter can assess the extent of the damage and recommend the appropriate repair method, which might involve replacing sections of the door.
Removing Old Paint
Removing old paint is necessary when the existing paint is peeling, chipping, or otherwise compromised. This ensures proper adhesion of the new paint and prevents future problems. Safety precautions are essential when working with paint removers and other chemicals.
- Safety First: Always wear appropriate safety gear, including gloves, eye protection, and a respirator, when working with paint removers or solvents. Work in a well-ventilated area or outdoors.
- Choose a Remover: Select a paint remover appropriate for the type of paint on your door (oil-based or water-based). Follow the manufacturer’s instructions carefully.
- Apply the Remover: Apply the remover according to the manufacturer’s instructions, usually with a brush or putty knife. Allow it to dwell for the recommended time to soften the paint.
- Scrape the Paint: Use a scraper or putty knife to remove the softened paint. Work carefully to avoid damaging the underlying wood. Multiple applications may be necessary.
- Clean and Neutralize: Once all the old paint is removed, clean the door thoroughly with a solvent recommended by the paint remover manufacturer to neutralize any remaining chemicals. Allow it to dry completely before priming.
Painting Techniques and Methods
Choosing the right painting technique is crucial for achieving a professional-looking finish on your front door. The method you select will depend on factors such as the size of the door, the type of paint used, and your personal skill level. Each method offers unique advantages and disadvantages, influencing the final result.
Paint Application Method Comparison
The selection of the appropriate painting method significantly impacts the final appearance and longevity of your painted front door. Consider the following comparison of common techniques:
| Method | Advantages | Disadvantages | Suitability for Different Door Materials |
|---|---|---|---|
| Brush | Provides excellent control and precision, ideal for detailed work and intricate designs; suitable for all paint types; relatively inexpensive. | Labor-intensive; can leave brush strokes visible if not applied carefully; slower application process than other methods. | Suitable for all door materials, particularly effective on wood doors with detailed molding. |
| Roller | Fast application, good for large, flat surfaces; provides relatively even coverage; less labor-intensive than brushing. | May not reach into corners or crevices easily; can leave roller marks if not properly blended; requires a paint tray and potentially additional tools. | Best suited for smooth, flat surfaces like solid core or fiberglass doors. Less effective on doors with intricate details. |
| Sprayer | Fastest application method; provides a very smooth, even finish; excellent for reaching hard-to-access areas. | Requires specialized equipment; can be messy if not used properly; potential for overspray; may require more preparation (masking) of surrounding areas. | Suitable for all door materials but requires careful masking and preparation to prevent overspray. Best for smooth surfaces to minimize texture build-up. |
Choosing Appropriate Paintbrushes and Rollers
The type of paintbrush and roller you choose directly affects the quality of your paint job. Using the incorrect tools can lead to uneven coverage, visible brushstrokes, and a less durable finish.
Different paint types (e.g., oil-based, latex) require different brushes. Oil-based paints benefit from natural bristle brushes, while synthetic brushes are generally preferred for latex paints. Similarly, the nap length of your roller should match the texture of your door surface. A shorter nap roller is ideal for smooth surfaces, while a longer nap roller is better for textured surfaces. For example, a high-quality angled brush is essential for achieving crisp lines along the edges of the door and around door hardware. A 3/8″ to 1/2″ nap roller works well for most front doors.
Applying Multiple Coats of Paint
Applying multiple coats is crucial for achieving a durable and even finish that will last. Each coat should be allowed to dry completely before applying the next. Drying times vary depending on the type of paint and environmental conditions (temperature and humidity). Before applying the second coat, lightly sand the first coat with fine-grit sandpaper to create a smoother surface and improve adhesion. This sanding step helps to remove any imperfections and creates better bonding between the coats. A thorough application of the second coat ensures consistent color and complete coverage, enhancing the overall durability and appearance of the freshly painted door. For optimal results, follow the manufacturer’s instructions regarding drying time between coats.
Hardware and Finishing Touches
The final touches on your freshly painted front door can significantly elevate its impact. Choosing the right hardware and adding subtle finishing details can transform a simple paint job into a statement piece, perfectly complementing your home’s architectural style and personal aesthetic. Careful consideration of these elements ensures a cohesive and polished look.
The selection of door hardware—knobs, handles, kick plates—plays a crucial role in determining the overall aesthetic of your front door. These seemingly small details contribute significantly to the overall impression, influencing the perceived style and even the functionality of the door. Consider the hardware as the jewelry of your front door; the right pieces can enhance the beauty of the paint color and the architecture of your home.
Hardware Styles and Paint Color Coordination
The style of your door hardware should complement the chosen paint color and the architectural style of your home. For example, a bold, deep blue door might pair beautifully with sleek, modern chrome or brushed nickel hardware, creating a contemporary and sophisticated look. Conversely, a classic, warm red door might be better suited to ornate brass or oil-rubbed bronze hardware, lending a traditional and welcoming feel. A softer, neutral gray door offers greater flexibility, accommodating a range of hardware styles from minimalist to more decorative options.
A Front Door Transformation Example
Imagine a once-unremarkable oak front door, painted a tired, peeling white. After thorough preparation, the door is transformed with a coat of rich, deep teal paint. This vibrant color instantly elevates the door’s presence. To complement the deep teal, elegant oil-rubbed bronze door hardware is installed. The substantial, arched handles and matching door knocker possess a weighty, quality feel, echoing the rich tone of the paint. A discreet, brushed bronze kick plate protects the lower portion of the door from scuffs and scratches, maintaining the overall sophisticated aesthetic. The final touch is a simple, yet elegant, wreath holder, also in oil-rubbed bronze, adding a welcoming and personalized element. The entire transformation showcases a refined, traditional style, creating a welcoming and visually stunning entrance to the home. The updated door not only looks beautiful but also feels more substantial and secure, enhancing the curb appeal significantly.
Budgeting and Material Selection
A successful front door paint job hinges not only on aesthetics but also on careful planning and resource allocation. Understanding the costs involved and selecting the right materials are crucial for achieving a high-quality finish without exceeding your budget. This section will guide you through budgeting your project and choosing the best materials for your needs.
Budget Breakdown for a Front Door Painting Project
Creating a realistic budget is the first step. This ensures you have enough funds to complete the project without unexpected expenses. Consider the following cost categories:
| Category | Estimated Cost (USD) | Potential Savings Strategies |
|---|---|---|
| Paint (1-2 gallons depending on door size) | $30 – $100 | Purchase paint during sales or consider using a sample size for smaller doors. Look for sales and coupons. |
| Primer (if needed) | $15 – $30 | If your existing paint is in good condition, you may be able to skip the primer. |
| Paintbrushes, rollers, and tray | $20 – $40 | Borrow tools from friends or family if possible. Consider purchasing a higher quality brush for better results. |
| Sandpaper, drop cloths, painter’s tape | $10 – $20 | Use old sheets or tarps instead of purchasing new drop cloths. |
| Hardware (hinges, handle, etc., if replacing) | $20 – $100+ | Reusing existing hardware can significantly reduce costs. |
| Total Estimated Cost | $95 – $290+ |
Note that these are estimates, and the actual cost may vary depending on the size of your door, the quality of materials chosen, and your location.
Exterior Paint Types: Cost and Benefits
Choosing the right type of exterior paint is vital for durability and longevity. Two common options are oil-based and latex paints.
Oil-based paints offer excellent durability and weather resistance, providing a long-lasting, hard-wearing finish. However, they are typically more expensive and have a strong odor, requiring more ventilation during application and longer drying times. Clean-up also requires solvents, adding to the overall cost.
Latex paints are generally more affordable and easier to clean up with water. They offer good durability and are less prone to cracking than oil-based paints. While their weather resistance may be slightly less than oil-based paints, they provide a good balance of cost, ease of application, and durability for most front door painting projects. Advances in latex technology continue to improve its longevity and weather protection.
Selecting High-Quality Paint and Durable Materials
Investing in high-quality paint and materials is essential for a professional-looking and long-lasting finish. Look for paints specifically designed for exterior use, indicating good UV protection and weather resistance. Check the paint’s sheen level; a semi-gloss or gloss finish is often preferred for front doors as it’s more durable and easier to clean. Choose durable brushes and rollers that won’t shed bristles, compromising the final finish. Similarly, ensure the painter’s tape is high quality to prevent bleeding. Using quality materials may seem more expensive upfront, but the increased durability translates to long-term cost savings by avoiding premature repainting.
Last Recap
Revitalizing your front door with a fresh coat of paint is a rewarding project that offers a significant return on investment, both aesthetically and financially. By following the steps outlined in this guide, you can confidently tackle this home improvement project, creating a welcoming and stylish entrance that reflects your personal style. Remember to prioritize proper preparation and technique for a long-lasting and beautiful finish. Enjoy the transformation!


