How to prevent water damage behind siding caused by improper flashing installation? This seemingly simple question hides a world of potential problems. Understanding flashing – its purpose, types, and proper installation – is crucial for protecting your home’s exterior and preventing costly repairs down the line. This guide delves into the intricacies of flashing, providing both preventative measures and solutions for existing issues, ensuring your siding remains a shield against the elements, not a pathway for water damage.
We’ll explore the different types of flashing materials, their best applications, and step-by-step installation techniques. We’ll also examine common mistakes that lead to water damage, providing visual cues and practical examples to help you identify potential problems. Learn how to properly install flashing around windows, doors, and complex architectural features, and discover effective repair methods for existing damage. By the end, you’ll be equipped to confidently assess, install, and maintain flashing, ensuring your home’s long-term protection.
Understanding Flashing and its Role in Preventing Water Damage
Proper flashing installation is crucial for preventing water damage behind siding. Flashing acts as a barrier, diverting water away from vulnerable areas of the building envelope, protecting the structure from costly repairs and potential mold growth. Understanding its purpose and proper installation is key to ensuring long-term building integrity.
Flashing’s Purpose in Siding Installation
Flashing’s primary purpose is to create a waterproof seal at critical points in the siding system where water could penetrate. These points typically include areas where the siding intersects with other building components, such as windows, doors, chimneys, and rooflines. Without proper flashing, water can easily seep behind the siding, leading to rot, mold, and structural damage. Effective flashing guides water along a predetermined path, ensuring it drains away from the building’s exterior.
Types of Flashing Materials and Their Applications
Several materials are used for flashing, each with its own advantages and disadvantages.
- Aluminum Flashing: A common and versatile choice, aluminum flashing is lightweight, durable, and resistant to corrosion. It’s suitable for a wide range of applications and is relatively inexpensive.
- Galvanized Steel Flashing: Stronger and more rigid than aluminum, galvanized steel offers excellent durability but is heavier and can be more susceptible to rust over time, especially in harsh environments. It’s often used in high-traffic areas or where greater strength is needed.
- Copper Flashing: A premium option known for its exceptional longevity and resistance to corrosion. Copper is highly durable and develops a protective patina over time, but it’s significantly more expensive than aluminum or steel.
- Plastic Flashing: Various types of plastic flashing are available, often used for less demanding applications. While cost-effective, their durability and longevity may be less than metal options. Careful selection based on specific environmental conditions is crucial.
Proper Flashing Installation Techniques
Proper installation is paramount for effective water diversion. Improper installation negates the protective benefits of the flashing.
- Preparation: Ensure the surface to be flashed is clean, dry, and free of debris. Any existing damaged materials should be removed and replaced.
- Cutting and Shaping: Cut the flashing material to the required size and shape, ensuring adequate overlap for watertight seals. Overlapping flashing pieces should overlap at least 4 inches.
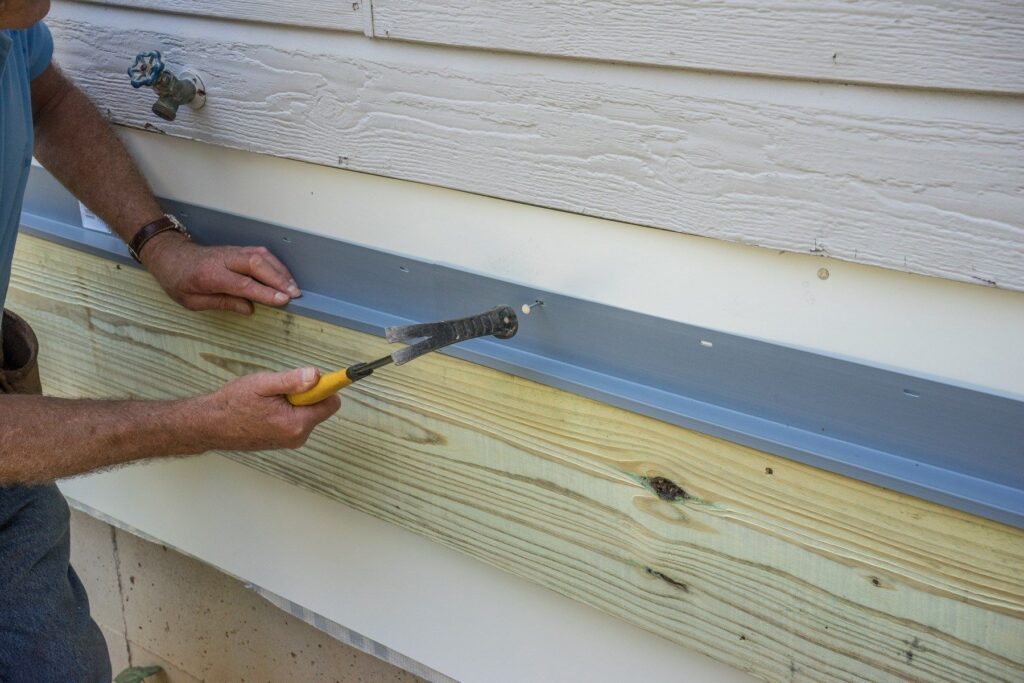
- Securing the Flashing: Use appropriate fasteners to secure the flashing to the building’s structure. The type of fastener will depend on the flashing material and the substrate. Avoid over-tightening to prevent damage to the flashing.
- Creating Overlaps and Seals: Overlap flashing pieces appropriately, ensuring a continuous watertight seal. Seal seams and joints using high-quality sealant compatible with both the flashing material and the substrate. Caulk is frequently used for this purpose.
- Installation Around Windows and Doors: Flashing around windows and doors requires careful attention to detail. Water often accumulates in these areas. Install flashing to direct water away from the window or door frame and down the exterior wall. Properly sealed window and door flashing is often a crucial point of failure in water damage prevention.
Comparison of Flashing Installation Methods
Different methods exist depending on the specific application and building materials. For example, installing flashing around a window might involve creating a stepped flashing system to ensure water is effectively diverted. This involves layering pieces of flashing to create a series of overlapping steps, guiding water away from the vulnerable areas. In contrast, flashing on a flat surface might simply involve overlapping pieces and sealing the seams. The choice of method depends on the specific situation and requires careful consideration of water flow patterns.
Identifying Signs of Improper Flashing Installation
Identifying improper flashing installation can be crucial in preventing costly water damage. Early detection allows for timely repairs, minimizing the extent of damage and preventing further structural issues. Recognizing the visual cues and understanding the typical patterns of water damage associated with faulty flashing is key to effective preventative maintenance.
Improper flashing installation manifests in various ways, often leading to water intrusion behind the siding. These problems aren’t always immediately obvious, but a careful inspection can reveal telltale signs. Water damage often appears as stains, discoloration, or even visible mold growth on interior walls. Exterior inspections can reveal damaged or missing flashing, gaps around windows and doors, and signs of water staining on the siding itself.
Visual Indicators of Faulty Flashing
Visual inspection is the first step in identifying potential problems. Look for gaps or missing pieces of flashing around windows, doors, chimneys, and other penetrations in the siding. Check for rust, corrosion, or damage to the flashing material itself. Pay close attention to areas where the flashing meets other building components, such as the roofline or window frames. Signs of buckling, warping, or improper overlapping of flashing pieces are also strong indicators of faulty installation. Water stains or discoloration on the siding, particularly around vulnerable areas, suggest water penetration. Bulging or soft areas on the exterior wall can indicate water accumulation behind the siding.
Water Damage Patterns Associated with Improper Flashing
Water damage patterns often follow predictable routes. Water tends to follow gravity, often seeping into the wall cavity at the top of the flashing and running down the wall. This can lead to water damage concentrated at the bottom of walls, particularly in basements or lower floors. Water damage may appear as dark stains or discoloration on interior walls or ceilings, especially in areas directly below the problem area. In severe cases, mold growth may be visible. The extent of the damage depends on the severity and duration of the water intrusion, as well as the building materials. For example, a small gap in flashing around a window might only lead to minor staining, while a completely missing piece of flashing around a chimney could cause extensive damage.
Common Flashing Installation Mistakes and Consequences
| Mistake | Consequence | Example | Solution |
|---|---|---|---|
| Improper Overlap | Water penetration at the seam | Flashing pieces not overlapping sufficiently, leaving gaps. | Ensure adequate overlap (minimum 4 inches) and use sealant. |
| Incorrect Flashing Material | Corrosion and failure | Using galvanized steel in a highly corrosive environment. | Select appropriate material for the specific environment (e.g., copper, aluminum). |
| Missing Flashing | Direct water penetration | No flashing installed around a chimney or window. | Install appropriate flashing material, ensuring proper sealing and connection to other components. |
| Poor Sealant Application | Leaks around joints | Insufficient sealant or improper application technique. | Use a high-quality sealant, ensuring complete coverage of all joints and seams. |
Preventing Water Damage During Siding Installation
Proper flashing installation is crucial not only for preventing existing water damage but also for ensuring the longevity and structural integrity of your building during new siding projects. Neglecting proper flashing techniques during installation can lead to costly repairs down the line, impacting both the building’s aesthetic appeal and its structural soundness. This section outlines key preventative measures to implement during siding installation to avoid future water damage issues.
Checklist for Inspectors to Ensure Proper Flashing Installation
A thorough inspection checklist is vital to ensure the effective prevention of water damage. This checklist should be used by inspectors at various stages of the siding installation process, from initial planning to final completion. A comprehensive approach minimizes risks and ensures quality workmanship.
- Verify that flashing materials are appropriate for the climate and building materials used.
- Inspect all flashing for proper overlap and sealing, ensuring no gaps or openings exist.
- Confirm that flashing extends beyond the siding to prevent water penetration.
- Check that flashing is properly secured to the building structure, using appropriate fasteners.
- Examine the installation of flashing around windows, doors, and other penetrations for proper sealing and continuity.
- Verify that all flashing is properly sloped to direct water away from the building.
- Inspect for any signs of damage to the flashing during or after installation.
- Confirm that the flashing is compatible with the chosen siding material.
- Document all findings, including photographs, and clearly identify any areas requiring correction.
Best Practices for Flashing Installation Around Penetrations
Proper flashing around windows, doors, and other building penetrations is critical to preventing water infiltration. These areas are particularly vulnerable because they represent breaks in the building’s weather barrier. Careful attention to detail is crucial for effective protection.
- Begin by installing a continuous flashing membrane behind the window or door frame, extending well beyond the frame on all sides. This acts as the primary water barrier.
- Next, install flashing around the window or door frame, ensuring it overlaps the continuous membrane and extends beyond the siding. The flashing should be carefully sealed at all seams to prevent water penetration.
- Use sealant to create a watertight seal between the flashing and the window or door frame, as well as between the flashing and the siding.
- For complex penetrations, consider using multiple layers of flashing, each overlapping the previous layer to provide additional protection.
- Ensure proper drainage by sloping the flashing away from the penetration. This prevents water from pooling and seeping into the building.
Installing Flashing Around Complex Architectural Features
Complex architectural features, such as dormers, chimneys, and valleys, require a more nuanced approach to flashing installation. These areas often present unique challenges due to their intricate design and multiple intersecting planes. A systematic, step-by-step approach is essential to guarantee complete water protection.
- Assess the specific requirements of each complex architectural feature, considering its shape, orientation, and potential for water accumulation.
- Develop a detailed flashing plan, incorporating multiple layers of flashing as needed, to create a fully waterproof system. This plan should account for all potential water entry points.
- Begin installation at the lowest point of the feature, working upwards. This ensures that water flows away from the building.
- Use appropriate flashing materials and fasteners for each specific area. For example, heavier gauge metal flashing may be required for areas with higher water exposure.
- Pay close attention to detail in areas where flashing layers intersect. Ensure complete overlap and secure sealing to prevent water leakage.
- Regularly inspect the flashing installation during and after completion to identify and correct any issues.
Repairing Existing Flashing Issues
Addressing existing flashing problems requires careful assessment and appropriate repair techniques to prevent further water damage. Improperly installed or damaged flashing can lead to significant structural issues and costly repairs if left unaddressed. This section details the process of repairing or replacing faulty flashing.
Repairing existing flashing involves a multi-step process that begins with a thorough inspection to identify the extent of the damage. This inspection should cover the entire area where flashing is installed, looking for gaps, cracks, rust, or other signs of deterioration. The type of flashing material and the location of the damage will influence the repair method chosen. Remember safety first: always wear appropriate personal protective equipment (PPE) including gloves and safety glasses when working at heights or with sharp objects.
Removing and Replacing Faulty Flashing
Removing and replacing severely damaged flashing is often the most effective solution. This involves carefully removing the old flashing, cleaning the area thoroughly, and installing new flashing correctly. For instance, if the flashing around a window is severely rusted and cracked, it’s best to remove it completely rather than attempt a patch. This ensures a watertight seal. Use appropriate tools like a pry bar or putty knife to carefully remove the old flashing, taking care not to damage the underlying siding or structure. Once the old flashing is removed, clean the area of any debris, loose paint, or old sealant. Then, install new flashing, ensuring it overlaps correctly and extends sufficiently beyond the vulnerable areas. Secure the new flashing with appropriate fasteners, ensuring a tight seal.
Using Appropriate Sealant and Caulking During Repairs
Proper sealant and caulking are crucial for creating a watertight seal around flashing. The choice of sealant depends on the material of the flashing and the specific application. For example, a high-quality silicone caulk is suitable for most exterior applications, offering excellent durability and weather resistance. Butyl rubber sealant is another excellent option known for its elasticity and ability to withstand temperature fluctuations. Apply sealant generously, ensuring complete coverage of all joints and seams. Avoid over-applying sealant, as this can lead to cracking and failure. Allow the sealant to cure completely according to the manufacturer’s instructions before exposing the area to moisture.
Inspecting Flashing After Repairs
A post-repair inspection is critical to verify the effectiveness of the repairs. This involves visually inspecting the repaired area for any gaps, cracks, or other imperfections. Pay close attention to the sealant and caulking, ensuring it is properly applied and has cured completely. After a rainfall, check for any signs of water leakage around the repaired flashing. If any issues are detected, additional repairs may be necessary. Regular inspection of flashing is a key part of preventative maintenance, helping to identify and address minor issues before they escalate into significant problems.
Materials and Tools for Flashing Installation and Repair
Proper flashing installation and repair require the right tools and materials. Choosing appropriate materials is crucial for ensuring long-term protection against water damage. The selection will depend on the specific application and the existing building materials.
Selecting the correct materials and tools is essential for successful flashing installation and repair, preventing costly water damage down the line. The longevity and effectiveness of the flashing system are directly tied to the quality of components used.
Flashing Materials
Appropriate flashing materials provide a durable and watertight seal. Different materials offer varying degrees of flexibility, durability, and resistance to corrosion and degradation.
- Aluminum Flashing: Lightweight, durable, and corrosion-resistant, making it suitable for many applications. Its flexibility allows it to conform to various shapes and surfaces.
- Galvanized Steel Flashing: Strong and relatively inexpensive, but susceptible to rust over time, especially in harsh environments. Regular maintenance might be necessary.
- Copper Flashing: Highly durable and corrosion-resistant, offering excellent longevity. It’s a premium option, known for its aesthetic appeal and resistance to weathering, but also more expensive.
- Plastic Flashing (PVC or Vinyl): A cost-effective option, suitable for less demanding applications. However, it may not be as durable or resistant to extreme temperatures as metal flashings.
Sealants and Caulking Materials
The choice of sealant or caulking significantly impacts the watertightness of the flashing system. Different sealants offer varying levels of flexibility, adhesion, and resistance to UV degradation and temperature fluctuations.
- Silicone Caulk: Excellent adhesion and flexibility, offering good resistance to water and UV exposure. It’s a versatile option suitable for many applications.
- Butyl Rubber Sealant: Highly durable and resistant to weathering, offering excellent adhesion and flexibility. It’s often preferred for critical applications requiring a long-lasting seal.
- Acrylic Latex Caulk: A more affordable option, but less durable than silicone or butyl rubber. It’s suitable for less demanding applications and is paintable.
Tools for Flashing Installation and Repair
The tools required will vary depending on the complexity of the job, but a basic set includes:
- Measuring Tape: Accurate measurements are crucial for cutting flashing to the correct size.
- Tin Snips: For cutting metal flashing to size and shape.
- Utility Knife: For cutting plastic flashing and sealants.
- Caulk Gun: For applying sealants and caulking.
- Hammer: For securing nails or staples (if applicable).
- Screwdriver (various sizes): For securing screws (if applicable).
- Level: To ensure proper alignment and installation of flashing.
- Safety Glasses and Gloves: Essential for personal protection.
Illustrative Examples of Correct and Incorrect Flashing
Understanding the practical application of proper flashing installation is crucial to preventing water damage. Visual examples help solidify this understanding, highlighting the critical differences between effective and ineffective techniques. The following examples illustrate correct and incorrect flashing installation in common scenarios.
Correct Flashing Installation Around a Window
This example details the installation of flashing around a typical double-hung window measuring 36 inches wide by 48 inches tall, set within a wood-framed wall. The flashing material used is 26-gauge galvanized steel, chosen for its durability and resistance to corrosion. The installation process begins with the installation of a continuous piece of flashing, extending at least 6 inches beyond the window frame on all sides. This base flashing is installed over the weather-resistant barrier (WRB) and beneath the siding. Next, a second layer of flashing, called the counter flashing, is installed over the window frame, overlapping the base flashing by at least 2 inches. The top of this counter flashing extends up and over the window head flashing. At the sides, the counter flashing is tucked neatly under the window sill flashing which is then tucked into the window frame, creating a completely sealed barrier against water intrusion. All seams are carefully sealed with high-quality silicone caulk to ensure a watertight seal. Finally, the siding is installed over the flashing, ensuring proper overlap to prevent water from getting behind it. This multi-layered approach, with meticulous attention to overlaps and sealant application, prevents water from penetrating the wall system.
Incorrect Flashing Installation Around a Door
Consider a scenario where flashing around an exterior door is installed incorrectly. A single piece of flashing is simply placed behind the door frame, with the top edge tucked under the header. No counter flashing is installed. The consequences of this are significant. During periods of heavy rain or snowmelt, water can easily run down the exterior of the door frame and behind the single piece of flashing. Since there is no overlap or counter flashing to prevent this water from penetrating further, the water can then accumulate behind the siding, causing rot in the door frame, wall studs, and potentially the surrounding structure. Mold and mildew growth can also occur, leading to significant structural damage and costly repairs. This improper installation fails to create the necessary water barrier, leaving the building vulnerable to water intrusion and subsequent damage.
Cross-Section of Proper Flashing Placement
The following text-based diagram illustrates a cross-section of proper flashing placement around a window. Imagine a vertical wall section.
“`
Siding
|
|
V
————————————
| | |
| Window | |
| | |
————————————
^ ^
| |
Counter Flashing Base Flashing
| |
V V
————————————
| WRB (Weather-Resistant Barrier) |
————————————
| | |
| Wall Studs | |
————————————
“`
The diagram shows the base flashing installed under the siding and over the WRB, with the counter flashing overlapping it and extending above the window frame. This creates a protective barrier against water penetration.
Epilogue
Proper flashing installation is paramount to preventing costly water damage behind your siding. By understanding the crucial role flashing plays, identifying signs of improper installation, and employing the best practices outlined in this guide, you can significantly reduce the risk of water intrusion. Remember that regular inspection and prompt repair of any damage are key to maintaining the integrity of your home’s exterior and preserving its value. Investing time and effort in proper flashing installation is an investment in the longevity and structural soundness of your property.


