How to effectively repair damaged or deteriorated siding trim is a crucial skill for homeowners seeking to maintain curb appeal and protect their property. This guide delves into the process, from identifying the type and extent of damage to selecting appropriate materials and employing effective repair techniques. We’ll explore various siding materials, detailing the best methods for each, and providing crucial safety tips throughout. Understanding the underlying causes of damage is key to preventing future issues, and we’ll cover preventative maintenance strategies to ensure your siding trim remains in top condition for years to come.
Whether you’re dealing with minor cracks, significant rot, or insect damage, this comprehensive guide will equip you with the knowledge and confidence to tackle siding trim repairs effectively. We will cover various repair techniques, from simple patching to complete section replacement, ensuring a seamless and aesthetically pleasing finish. The step-by-step instructions, coupled with visual aids (in the full article), will make the process manageable even for novice DIY enthusiasts.
Identifying Siding Trim Damage
Identifying the type and extent of damage to your siding trim is the crucial first step in any repair project. A thorough inspection will guide your material selection, determine the complexity of the repair, and ultimately ensure a successful outcome. Failing to properly assess the damage can lead to inadequate repairs and further deterioration.
Common Types of Siding Trim Damage
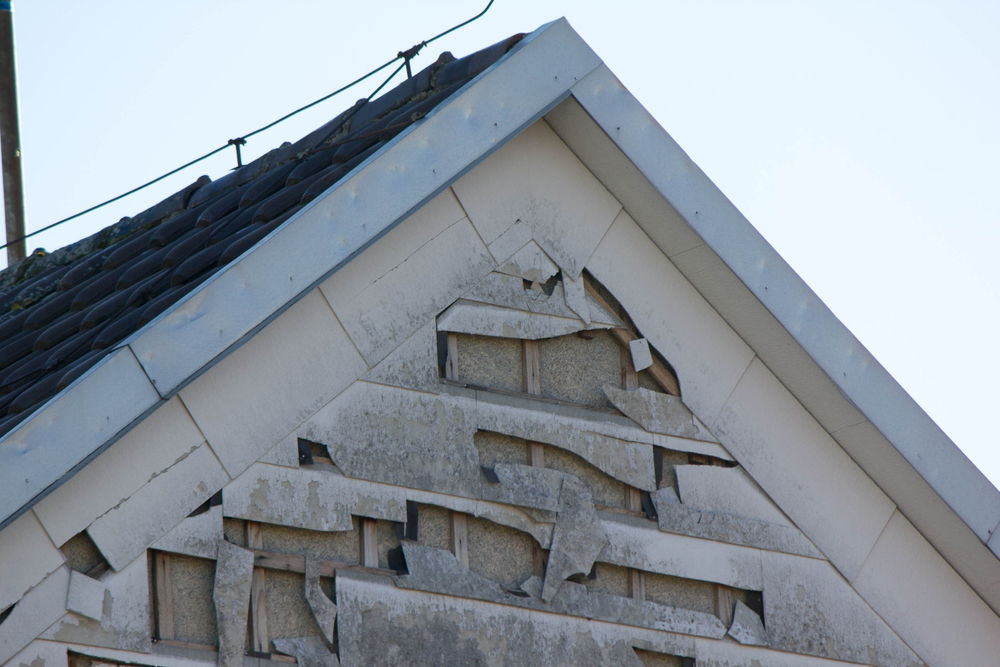
Siding trim damage manifests in several ways. Rot, caused by prolonged exposure to moisture, is a prevalent issue, often appearing as soft, spongy wood that may crumble easily. Insect infestation, particularly from carpenter ants or termites, can create significant structural weakening, often evidenced by holes, tunnels, or frass (insect droppings). Physical damage, such as cracks, splits, and dents, may result from impacts, extreme weather conditions (like hail), or improper installation. Finally, sun exposure and weathering can lead to fading, discoloration, and the eventual breakdown of the wood fibers.
Tools for Inspecting Siding Trim
A successful inspection requires the right tools. A sturdy ladder is essential for safe access to higher areas. Gloves will protect your hands from splinters and potential hazards. A putty knife or screwdriver can be used to gently probe suspected areas of rot or insect damage. A bright flashlight or inspection mirror is helpful for accessing hard-to-see areas. Finally, a camera can be used to document the damage for reference during the repair process. Taking detailed photographs can be particularly helpful when dealing with insurance claims.
Visual Assessment of Siding Trim Damage
Begin your inspection by visually scanning the entire trim. Look for any obvious signs of damage, such as cracks, splits, holes, or discoloration. Pay close attention to areas prone to moisture accumulation, such as joints, corners, and areas near the ground. Once you’ve identified potential problem areas, use a putty knife or screwdriver to gently probe any suspicious areas. If the wood feels soft, spongy, or crumbles easily, it is likely rotted. Look for signs of insect activity, such as holes, tunnels, or frass. Note the size and location of all damage, taking photographs as you go. This detailed assessment will be essential in determining the scope of the repairs needed.
Identifying the Underlying Cause of Damage
Determining the root cause of the damage is critical for preventing future problems. Water damage, often indicated by rot and discoloration, frequently stems from leaky gutters, downspouts, or improperly sealed joints. Insect infestation requires identifying the specific pest and addressing their access points. Age and weathering are often unavoidable, but proper maintenance can mitigate their impact. For example, a home exposed to frequent hailstorms might exhibit numerous dents and cracks, requiring replacement or repair of damaged sections. Understanding the underlying cause allows for targeted repairs and preventative measures.
Material Selection for Repairs
Choosing the right material for your siding trim repair is crucial for both aesthetics and longevity. The ideal material will depend on factors such as your budget, the existing siding type, and the level of maintenance you’re willing to undertake. Let’s explore some popular options and their respective advantages and disadvantages.
Siding Trim Material Comparison
Several materials are commonly used for siding trim repair, each offering a unique balance of durability, cost, and aesthetic appeal. Wood, vinyl, and composite materials are popular choices, each with its own set of pros and cons.
Wood Siding Trim
Wood, a classic choice, offers a natural and versatile look. However, it requires regular maintenance, including painting or staining, to prevent rot and insect damage. Different wood types offer varying levels of durability; cedar and redwood are known for their natural resistance to rot and insects, while less durable woods require more frequent maintenance. The cost of wood varies greatly depending on the species and quality.
Vinyl Siding Trim
Vinyl siding trim is a low-maintenance and cost-effective option. It’s resistant to rot, insects, and moisture damage, making it a durable choice for many climates. Vinyl is available in a wide range of colors and styles, offering versatility in design. However, it can be less aesthetically pleasing than wood to some, and it can become brittle and crack in extremely cold climates. It also doesn’t hold paint well.
Composite Siding Trim
Composite siding trim materials, often made from a blend of wood fibers and polymers, combine the aesthetics of wood with the durability and low maintenance of vinyl. They are resistant to rot, insects, and moisture, and require minimal upkeep. However, composite materials can be more expensive than vinyl and may not offer the same level of natural beauty as wood. Some composite materials can fade over time in direct sunlight.
Material Properties Comparison Table
| Material | Lifespan (Years) | Maintenance Requirements | Approximate Cost (per linear foot) |
|---|---|---|---|
| Wood (Cedar/Redwood) | 20-30+ (with proper maintenance) | Regular painting/staining, occasional repair | $5-$20 |
| Wood (Pine/Fir) | 10-20 (with proper maintenance) | Frequent painting/staining, more frequent repair | $3-$15 |
| Vinyl | 20-30+ | Minimal cleaning, occasional repair | $2-$8 |
| Composite | 25-40+ | Minimal cleaning, occasional repair | $4-$15 |
Repair Techniques for Different Materials
Repairing damaged siding trim requires a nuanced approach, varying significantly depending on the material. Proper techniques ensure a durable and aesthetically pleasing repair, extending the life of your home’s exterior. The following sections detail the processes for common siding trim materials.
Wood Siding Trim Repair
Repairing damaged wood siding trim involves several steps to restore its integrity and appearance. First, thoroughly clean the damaged area using a stiff brush and a solution of mild detergent and water. This removes dirt, debris, and loose paint, allowing for proper adhesion of subsequent treatments. Once dry, carefully sand the damaged area using progressively finer grit sandpaper (e.g., starting with 80-grit and moving to 120-grit or higher), smoothing out any rough edges or splinters. Any significant rot or decay must be completely removed before proceeding. Apply a wood primer designed for exterior use, ensuring complete coverage. Allow the primer to dry completely according to the manufacturer’s instructions. Finally, apply exterior-grade paint, using multiple thin coats for optimal coverage and durability. Allow each coat to dry before applying the next.
Vinyl Siding Trim Replacement
Damaged sections of vinyl siding trim are typically best replaced rather than repaired. Vinyl is not easily patched and attempts to do so often lead to an unsightly result. Begin by measuring the damaged section to determine the necessary replacement length. Carefully remove the damaged section using a utility knife or similar tool, ensuring not to damage the surrounding siding. Insert the new piece of vinyl siding trim, ensuring it is properly aligned and fits snugly. Secure the new piece using appropriate fasteners, following the manufacturer’s recommendations. If necessary, use caulk to seal any gaps between the new trim and the existing siding, ensuring a weathertight seal.
Composite Siding Trim Repair
Composite siding trim, often made from materials like fiber cement, requires a slightly different approach. Similar to wood, begin by cleaning the damaged area with a brush and mild detergent solution. Any loose or damaged material should be carefully removed, exposing sound material. Minor scratches or chips can often be repaired using a composite filler specifically designed for this purpose. Apply the filler according to the manufacturer’s instructions, ensuring a smooth, even surface. Once dry, sand the filled area smooth with fine-grit sandpaper. If necessary, apply a primer compatible with composite materials before painting with an exterior-grade paint. For more significant damage, replacement of the damaged section may be necessary, following a process similar to vinyl siding replacement.
Tools and Equipment
Proper tools and equipment are crucial for efficient and safe siding trim repair. Having the right tools on hand will not only speed up the process but also ensure a higher quality repair, minimizing the risk of further damage. The selection will vary slightly depending on the type of siding and trim material, but a comprehensive kit will cover most scenarios.
The tools required for siding trim repair can be broadly categorized by their function, ensuring a streamlined workflow. Careful consideration of each tool’s purpose and proper usage is essential for achieving a professional-looking and durable repair. Safety should always be the top priority, and appropriate precautions must be taken when using power tools.
Measuring and Marking Tools
Accurate measurements are paramount for precise cuts and proper fitting of replacement trim. Inaccurate measurements can lead to wasted materials and an unsatisfactory repair. Therefore, having the right measuring tools is the foundation of a successful project.
- Measuring tape: A durable, retractable tape measure at least 25 feet long is essential for accurate length measurements.
- Combination square: This tool combines a square, level, and marking gauge, useful for checking angles and marking cut lines.
- Pencil: A carpenter’s pencil is ideal for marking wood; its lead is harder and less prone to smudging than standard pencils.
Cutting Tools
Selecting the appropriate cutting tool depends heavily on the material of the siding trim. Using the wrong tool can lead to chipped, splintered, or otherwise damaged materials, compromising the final repair.
- Hand saw: A fine-toothed hand saw is suitable for precise cuts in wood trim, offering good control for intricate work.
- Circular saw: A circular saw with a fine-tooth blade is faster for cutting larger quantities of wood trim. Always use a safety guard.
- Jigsaw: A jigsaw provides versatility for curved cuts and intricate shapes, particularly useful for repairing damaged trim with complex profiles.
- Utility knife: A sharp utility knife is useful for trimming caulk and cutting flexible materials like vinyl or composite trim.
Fastening Tools
Secure fastening is critical for the longevity and structural integrity of the repair. The choice of fastener depends on the material being used and the application.
- Hammer: A claw hammer is essential for driving nails, and a rubber mallet can help prevent damage to the trim.
- Nail gun (optional): A pneumatic or cordless nail gun significantly speeds up the fastening process, especially for larger repairs. Always follow the manufacturer’s safety guidelines.
- Screwdriver (various sizes): Phillips and flathead screwdrivers are needed for various types of screws.
- Drill (optional): A drill with various drill bits is helpful for pre-drilling holes to prevent splitting, especially in hardwood trim.
Other Essential Tools
Beyond the core categories, several additional tools greatly aid the repair process. These tools improve efficiency and help achieve a higher quality finish.
- Putty knife: For applying and smoothing caulk or wood filler.
- Caulk gun: For applying caulk efficiently and evenly.
- Safety Glasses: Protecting your eyes is crucial when using power tools.
- Level: Ensures that the repaired trim is installed straight and level.
Safety Precautions for Power Tools
Power tools present significant safety risks if not handled correctly. Always prioritize safety by following these guidelines.
- Always wear appropriate safety gear, including eye protection, hearing protection, and work gloves.
- Ensure the power tool is properly grounded and the cord is in good condition.
- Never operate a power tool while fatigued or under the influence of drugs or alcohol.
- Maintain a firm grip on the tool and keep your fingers clear of the blade or cutting surface.
- Use the correct blade or bit for the material being cut.
- Inspect the work area for hazards before starting the project.
- Disconnect the power tool before making adjustments or changing blades.
Essential Safety Gear
Protecting yourself from potential hazards is paramount. Never compromise on safety.
- Safety glasses or goggles: Protect your eyes from flying debris.
- Hearing protection: Reduce noise exposure from power tools.
- Work gloves: Protect your hands from cuts and splinters.
- Dust mask or respirator: Protect your lungs from dust and fumes, especially when working with wood.
- Safety shoes: Protect your feet from falling objects or dropped tools.
Preventing Future Damage
Proactive maintenance is key to extending the lifespan of your siding trim and avoiding costly repairs. Regular inspections and preventative measures can significantly reduce the likelihood of damage from water, pests, or the elements. By understanding the common causes of deterioration and implementing appropriate solutions, you can ensure your siding trim remains attractive and functional for years to come.
Regular inspections and cleaning are fundamental to preventing future damage. Neglecting these simple steps can lead to small problems escalating into significant and expensive repairs.
Regular Inspections
Regular visual inspections, ideally twice a year (spring and fall), are crucial. During these inspections, check for signs of cracking, warping, rotting, insect infestation (look for holes, sawdust, or insect activity), loose nails or screws, and areas where paint is peeling or blistering. Pay close attention to areas prone to moisture accumulation, such as corners, joints, and areas near the ground. Early detection of these issues allows for prompt and less invasive repairs. For example, a small crack detected early can be easily filled, preventing it from becoming a larger problem that requires more extensive repair or even replacement of the entire trim piece.
Cleaning Siding Trim
Regular cleaning removes dirt, debris, and mildew buildup that can trap moisture and accelerate deterioration. Use a soft-bristled brush and a gentle cleaning solution (a mixture of mild detergent and water is usually sufficient). For stubborn mildew, consider using a mildew remover according to the manufacturer’s instructions. Always rinse thoroughly with clean water after cleaning to prevent residue buildup. Power washing should be avoided, as the high pressure can damage the siding trim, especially older or more delicate materials.
Selecting Appropriate Sealants and Paints
The selection of high-quality sealants and paints is critical for protecting your siding trim from the elements. Sealants should be specifically designed for exterior use and be resistant to UV degradation, moisture, and temperature fluctuations. Look for sealants with good adhesion properties and flexibility to accommodate movement in the siding. Paints should also be formulated for exterior use, offering UV protection, mildew resistance, and excellent durability. Consider using a primer before applying the topcoat to ensure better adhesion and paint longevity. For example, using a high-quality acrylic latex paint with UV protection will offer significantly longer protection than a cheaper, less durable alternative.
Addressing Water Infiltration and Pest Infestation
Water infiltration and pest infestation are two major contributors to siding trim damage. Addressing these issues promptly is essential to prevent further deterioration.
Water Infiltration Prevention
Proper caulking and sealing around windows, doors, and other penetrations in the siding are crucial to prevent water from entering. Regularly inspect and reapply caulk as needed, paying attention to areas where cracks or gaps may have developed. Ensure proper drainage around the foundation to prevent water from accumulating against the siding. Gutters and downspouts should be regularly cleaned to ensure efficient water runoff away from the house. Addressing any grading issues that cause water to pool near the foundation will also help prevent water damage.
Pest Infestation Prevention
Regularly inspect the siding trim for signs of pest infestation. Repair any cracks or holes that pests might use to enter. Consider using pest-resistant materials when making repairs. Professional pest control services may be necessary in cases of severe infestations. Using insecticidal treatments, in accordance with safety guidelines, can prevent further damage caused by wood-boring insects. Maintaining good landscaping around the foundation helps prevent pest harborage.
Advanced Repair Techniques
Repairing severely damaged or rotted wood siding trim often requires more advanced techniques than simple patching. These techniques demand careful attention to detail and a thorough understanding of wood repair and carpentry. Successfully completing these repairs ensures the longevity and aesthetic appeal of your home’s exterior.
Severely Damaged or Rotted Wood Trim Repair
Addressing extensive rot requires aggressive action. Begin by removing all visibly damaged and compromised wood, extending the cut beyond the visibly affected area to ensure the removal of all decayed material. This often means cutting back to sound wood, potentially removing a significant portion of the trim. After cleaning the area, apply a wood preservative to prevent further decay. Once dry, reconstruct the missing section using compatible wood, ensuring a tight fit and secure fastening. For large areas, consider using epoxy wood filler to strengthen the repaired section before applying finishing touches. This process may require multiple layers of filler for optimal results. The repaired section should then be sanded smooth and primed before painting or staining to match the existing trim.
Significant Section Replacement
Replacing large sections of siding trim necessitates precise measurements and careful cutting of the replacement piece. First, carefully remove the damaged section, noting the dimensions and profile of the removed piece. Transfer these measurements to your replacement wood. Use a sharp saw, such as a miter saw, for accurate cuts. When fitting the new piece, ensure a snug and secure fit. Use appropriate fasteners, such as exterior-grade screws or nails, to attach the new trim securely. Caulk any gaps to prevent water intrusion. The use of construction adhesive in addition to fasteners provides extra security and prevents movement.
Matching New Trim to Existing Trim
Matching new trim to existing trim is crucial for maintaining a consistent aesthetic. Start by carefully examining the existing trim to identify its species, profile, and finish. Select replacement wood that closely matches the existing material in both species and color. If the existing trim has a specific profile (e.g., a particular molding style), replicate that profile as accurately as possible during the cutting and shaping process. For paint, carefully select a paint that closely matches the existing color, or consider having the paint color matched at a home improvement store using a sample from the existing trim. For stained wood, consider using a similar stain and applying multiple coats to achieve a consistent color. Sanding between coats will create a smoother, more uniform finish.
Creative Solutions for Unique Trim Designs
Complex or intricately designed siding trim may require creative solutions. For example, if a decorative element is damaged beyond repair, consider carefully replicating it using modeling clay or wood putty. Once hardened, this can serve as a mold for creating a replacement piece from compatible material. Alternatively, for highly decorative trim, a skilled craftsman may be able to recreate the damaged section by hand. Photographs of the damaged section are invaluable for reference during the repair or replication process. Another approach for exceptionally intricate designs might involve sourcing a similar replacement piece from a salvage yard or architectural salvage company. This requires patience and diligent searching but may yield the perfect match.
Summary
Successfully repairing damaged siding trim not only enhances your home’s exterior but also protects it from further deterioration. By following the steps outlined in this guide, you can confidently address various types of damage, selecting the right materials and techniques for a lasting repair. Remember, regular inspection and preventative maintenance are crucial for extending the lifespan of your siding trim and avoiding costly repairs down the line. With the right tools, knowledge, and a little effort, you can maintain the beauty and integrity of your home’s exterior for years to come.


