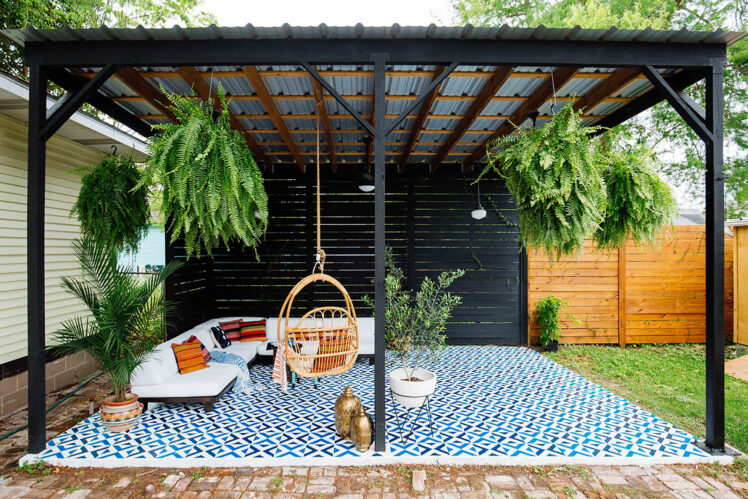
Budget-Friendly Backyard Makeover Ideas unveils a world of possibilities for transforming your outdoor space without breaking the bank. This guide explores creative landscaping techniques, affordable patio and seating solutions, inexpensive lighting options, and DIY décor projects, all designed to maximize impact while minimizing cost. Learn how to repurpose materials, utilize readily available resources, and implement simple yet effective strategies to create the backyard of your dreams.
From designing low-maintenance landscapes with budget-friendly plants to crafting stunning DIY outdoor features, this comprehensive guide offers practical advice and step-by-step instructions for every skill level. We’ll explore various cost-effective methods for creating a cozy and inviting atmosphere, incorporating elements like charming lighting schemes and unique decorative accents. Prepare to be inspired by the transformative power of smart planning and resourcefulness!
Budget-Friendly Landscaping
Transforming your backyard into a beautiful oasis doesn’t require breaking the bank. With a little creativity and planning, you can achieve a stunning landscape on a budget. This section details strategies for cost-effective landscaping, focusing on low-maintenance plants, DIY techniques, and creative repurposing of materials.
Low-Maintenance Landscaping Plan
A well-planned, low-maintenance landscape minimizes ongoing costs and effort. Choosing the right plants is crucial. The following table outlines some inexpensive and readily available options, categorized by their sunlight requirements and water needs. Remember to consider your local climate and soil conditions when making selections.
| Plant Name | Approximate Cost (per plant) | Sunlight Requirements | Water Requirements |
|---|---|---|---|
| Coneflowers (Echinacea) | $3-$5 | Full sun | Moderate |
| Sedum (Stonecrop) | $2-$4 | Full sun to partial shade | Low |
| Lavender | $4-$6 | Full sun | Moderate (drought-tolerant once established) |
| Daylilies (Hemerocallis) | $5-$8 | Full sun to partial shade | Moderate |
DIY Landscaping Techniques
Reducing labor costs is key to budget-friendly landscaping. Several DIY techniques can significantly lower expenses.
Employing DIY techniques offers significant cost savings. Consider these options:
- Weed control: Instead of expensive herbicides, use mulch to suppress weeds and retain soil moisture. Regular hand weeding is also effective.
- Soil preparation: Improve your soil quality by adding compost instead of buying expensive topsoil. Compost can be made from kitchen scraps and yard waste.
- Lawn care: Overseeding instead of complete lawn replacement can save money. Learn about proper mowing techniques to maintain a healthy lawn without excessive chemical treatments.
- Planting: Planting your own seedlings or purchasing plants from local nurseries or plant sales often offers lower prices than big-box stores.
Repurposing Materials for Landscaping Features
Repurposing materials adds unique character to your landscape while minimizing waste and cost. Here are three examples:
Turning discarded items into attractive landscaping elements provides both aesthetic and economic advantages.
- Tire planters: Old tires, cleaned and painted, can be stacked to create unique vertical planters. You can paint them vibrant colors or use them as a base for climbing plants. Ensure tires are properly cleaned before use to avoid potential environmental concerns. For stability, fill the tires partially with soil before planting.
- Pallet furniture: Disassembled pallets can be used to construct rustic benches, raised garden beds, or even a small shed. Sand and clean the wood before assembly and consider applying a weather-resistant sealant for longevity. Ensure pallets are treated wood, or appropriately cleaned to avoid insect infestation.
- Bottle mosaics: Broken glass bottles, cleaned and arranged creatively, can form beautiful pathways or decorative wall features. The different colors and textures of the glass add visual interest. Use a strong adhesive designed for outdoor use and consider adding a sealant to protect the mosaic from the elements.
Affordable Patio and Seating Areas
Transforming your backyard into a relaxing oasis doesn’t require a hefty budget. With creativity and resourcefulness, you can create a beautiful and functional patio and seating area without breaking the bank. This section explores budget-friendly options for both patios and seating, focusing on readily available materials and simple construction techniques.
Budget-Friendly Patio Design Using Concrete Pavers or Gravel
A patio built with concrete pavers or gravel offers a durable and attractive surface at a fraction of the cost of poured concrete. Concrete pavers come in a variety of colors and styles, allowing for customization to match your existing landscaping. Gravel provides a more rustic look and is exceptionally easy to install.
Materials List (for a 10′ x 10′ patio):
- Concrete Pavers: Approximately 100 pavers (Cost: $200 – $400 depending on type and supplier)
- Sand: 1 cubic yard (Cost: $30 – $50)
- Edging (optional): Plastic or metal edging to contain the pavers (Cost: $20 – $50)
- Gravel (alternative): 10 cubic yards (Cost: $150 – $300 depending on type and delivery)
- Landscape Fabric (for gravel): To prevent weed growth (Cost: $20 – $40)
The cost estimates provided are approximate and can vary based on location and supplier. Remember to factor in the cost of any tools you may need to rent or purchase. For example, a wheelbarrow and tamper are helpful for paver installation, while a shovel is essential for gravel projects. A level will ensure a smooth, even surface for both options. Installation time can range from a few hours for gravel to a full day for pavers, depending on experience.
Inexpensive Outdoor Seating Area Using Pallets or Repurposed Wood
Repurposed pallets or reclaimed wood offer a sustainable and inexpensive way to build comfortable outdoor seating. Pallets can be easily sanded, cleaned, and stained or painted to create a stylish and unique look.
Diagram: (Imagine a simple diagram showing two pallets stacked horizontally, forming a seat approximately 16 inches high. Two more pallets are placed vertically against the back, creating a backrest. The entire structure can be further enhanced with added cushions or throw pillows.)
The diagram illustrates a basic two-pallet bench. The dimensions are easily adjustable based on the size of the pallets and desired seating height. Remember to always check the pallets for any splinters or nails before sanding and painting. Appropriate safety gear, such as gloves and safety glasses, should be worn during construction. Depending on the condition of the wood, additional support structures (e.g., 2x4s) might be needed for added stability. A coat of sealant will help to protect the wood from the elements and extend the life of your seating area.
Creating a Cozy Atmosphere with Budget-Friendly Lighting and Decor
Adding lighting and decor elevates the ambiance of your outdoor seating area. String lights, lanterns, and solar-powered pathway lights offer a cost-effective way to create a warm and inviting atmosphere.
Examples:
- String Lights: Create a magical ambiance with warm-white or colored string lights draped across trees or along the patio. (Cost: $15 – $30)
- Lanterns: Place battery-operated or solar-powered lanterns on tables or along pathways for soft, ambient lighting. (Cost: $10 – $20 per lantern)
- Solar Pathway Lights: Guide the way and add subtle illumination to walkways and garden beds. (Cost: $15 – $30 per set)
- Repurposed Jars: Fill glass jars with fairy lights or candles for a charming and personalized touch. (Cost: Minimal, depending on availability of jars)
- Throw Pillows and Blankets: Add comfort and color with inexpensive throw pillows and blankets in coordinating patterns and textures.
These inexpensive additions significantly impact the overall look and feel of your outdoor space. Consider incorporating natural elements such as potted plants or decorative stones to further enhance the cozy atmosphere. Remember to choose weather-resistant materials for outdoor use to ensure longevity and safety.
Inexpensive Outdoor Lighting Solutions
Transforming your backyard into a magical oasis doesn’t require a hefty budget. Cost-effective outdoor lighting can significantly enhance the ambiance and functionality of your space, extending its usability into the evening hours. This section explores several budget-friendly options and guides you through their implementation.
Solar-Powered Lighting Schemes
Solar-powered lighting offers a practical and economical solution for illuminating your backyard. Their reliance on sunlight eliminates electricity costs, making them a truly budget-friendly choice. Below are three distinct lighting schemes utilizing solar-powered options.
- Pathway Lighting: Line your garden pathways with solar-powered pathway lights. These small, stake-mounted lights are readily available and typically cost between $5 and $20 each. A pathway of ten lights would cost approximately $50-$200. The soft glow creates a welcoming and safe route through the garden, ideal for evening strolls.
- Accent Lighting: Use solar-powered spotlights to highlight specific features, such as a beautiful tree, a water feature, or a striking sculpture. These spotlights typically range from $15 to $30 each. Highlighting two features would cost approximately $30-$60.
- Deck or Patio Lighting: Solar-powered deck lights, available in various styles, can illuminate your patio or deck area. These lights can range from $10 to $25 per light. A set of six lights would cost approximately $60-$150. The warm, ambient light creates a relaxing atmosphere perfect for outdoor gatherings.
String Light Installation Guide
String lights offer a versatile and affordable way to add charm and character to your backyard. Proper installation ensures both safety and aesthetic appeal. Here’s a step-by-step guide:
- Plan your layout: Determine the desired path and length of the string lights, considering the power source and any obstacles.
- Gather materials: You will need string lights (LED lights are energy-efficient and safer), zip ties or clips, and potentially a power strip if using non-solar lights.
- Secure the lights: Use zip ties or clips to attach the lights to fences, trees, or other structures. Ensure the spacing is even and visually appealing.
- Connect the power source: If using non-solar lights, connect the lights to a properly grounded outdoor power strip. For solar lights, ensure the solar panels receive adequate sunlight.
- Test and adjust: Once installed, test the lights to ensure they are functioning correctly. Make adjustments as needed to optimize the lighting effect.
Repurposed Materials Lighting
Repurposing materials adds a unique and personal touch to your outdoor lighting. For instance, glass jars can be transformed into charming luminaries by adding battery-operated tea lights or small LED candles. The cost is minimal, primarily involving the purchase of the LED lights, costing around $1-$3 per jar. Old tin cans can also be punched with decorative holes and fitted with LED candles for a rustic look, similarly inexpensive.
Solar-Powered Lighting vs. Traditional Lighting
Solar-powered lighting offers several advantages over traditional outdoor lighting. The most significant benefit is the elimination of electricity costs. While the initial investment in solar lights might be slightly higher than purchasing cheaper incandescent bulbs, the long-term savings on electricity bills quickly outweigh this. Solar lights also require minimal maintenance and are environmentally friendly, reducing your carbon footprint. Traditional lighting, on the other hand, involves ongoing electricity expenses and may require more frequent bulb replacements. For example, a homeowner using 10 traditional 60-watt bulbs for 5 hours nightly at a rate of $0.15/kWh would spend approximately $164 annually, compared to the one-time cost of solar lights.
DIY Outdoor Decor and Features
Transforming your backyard into a haven doesn’t require a hefty budget. With a little creativity and elbow grease, you can create stunning DIY outdoor decor and features that add personality and charm without breaking the bank. This section explores several simple yet impactful projects using readily available and inexpensive materials.
Three DIY Outdoor Decor Projects
Creating unique outdoor decor is surprisingly easy and affordable. The following projects demonstrate how inexpensive materials can be transformed into eye-catching pieces.
- Painted Mason Jar Lanterns: These charming lanterns provide soft, ambient lighting for evenings spent outdoors. Simply clean and dry several mason jars of various sizes. Apply a coat of primer, followed by your chosen paint color(s). Once dry, add a layer of sealant for weather protection. Place a tea light or battery-operated LED candle inside each jar for a warm glow. For a rustic look, leave some jars unpainted or distressed.
- Materials: Mason jars, paint (exterior quality), primer, sealant, tea lights or battery-operated LED candles.
- Recycled Tin Can Planters: Give old tin cans a new life by transforming them into vibrant planters. Clean and thoroughly dry the cans. Remove any labels. Paint the cans with bright colors or use decorative tape for a unique pattern. Once dry, add drainage holes to the bottom (using a hammer and nail). Fill with potting soil and your favorite plants.
- Materials: Clean tin cans, paint, decorative tape (optional), hammer, nail, potting soil, plants.
- Upcycled Pallet Planter Box: Discarded wooden pallets can be repurposed into a beautiful planter box. Disassemble the pallet carefully, removing any loose or damaged wood. Sand down the wood pieces to smooth any rough edges. Reassemble the pieces to create a box shape, securing them with screws or nails. Apply a weather-resistant sealant and paint if desired. Add a layer of landscape fabric before filling with soil and plants.
- Materials: Wooden pallet, screws or nails, sandpaper, weather-resistant sealant, paint (optional), landscape fabric, potting soil, plants.
Creating a Budget-Friendly Water Feature
Adding a water feature, even a small one, significantly enhances the ambiance of a backyard. The gentle sound of water is incredibly relaxing and adds a touch of tranquility.
A simple birdbath provides a beautiful and functional water feature. Choose a birdbath made of durable material like stone or concrete. Place it in a sunny location near some shrubs or trees to attract birds. Regularly clean and refill the birdbath with fresh water to keep it hygienic and inviting. Alternatively, a small, shallow pond can be created using a plastic liner, rocks, and aquatic plants. This requires more effort but provides a more substantial water feature.
- Birdbath: A pre-made birdbath is the easiest option. Alternatively, a large, shallow bowl can be used, but ensure it’s stable and weather-resistant.
- Small Pond: A flexible plastic pond liner is key, along with rocks and gravel for shaping and edging. Consider adding aquatic plants like water lilies for added beauty and ecosystem support. Ensure proper drainage to prevent waterlogging.
- Materials (Birdbath): Birdbath (or large, shallow, weather-resistant bowl).
- Materials (Small Pond): Flexible plastic pond liner, rocks and gravel, aquatic plants (optional).
Resources for Inexpensive Outdoor Decor
Finding free or affordable decor items is surprisingly easy with a little resourcefulness. Explore various avenues to uncover hidden treasures.
- Thrift Stores and Garage Sales: These are goldmines for unique and affordable decor items. You can often find planters, garden ornaments, and even outdoor furniture at significantly reduced prices.
- Online Marketplaces: Websites like Craigslist, Facebook Marketplace, and OfferUp offer a wide selection of used outdoor decor at bargain prices. Be sure to carefully inspect items before purchasing.
- Freecycle Networks: Join local Freecycle groups to find free items people are giving away. This is a great way to score unique pieces without spending a dime.
- Nature’s Bounty: Don’t underestimate the beauty of natural elements. Gather fallen branches, pinecones, and stones to create rustic and charming decor.
Painting and Repairing Existing Structures
Revitalizing existing outdoor structures like fences and decks, and refreshing furniture, can significantly enhance your backyard’s aesthetic appeal without breaking the bank. A fresh coat of paint or some minor repairs can make a world of difference, extending the life of your structures and adding curb appeal. This section details budget-friendly methods for achieving these improvements.
Preparing and Painting a Wooden Fence or Deck
Proper preparation is key to a long-lasting paint job. Begin by thoroughly cleaning the surface. Use a pressure washer (if available) to remove dirt, mildew, and loose paint. For stubborn stains, a solution of bleach and water can be effective, but always test in an inconspicuous area first. Allow the surface to dry completely before proceeding. Next, repair any damaged areas, filling holes and cracks with wood filler. Once the filler is dry, sand the entire surface smooth, removing any splinters or rough patches. Apply a quality primer to ensure better paint adhesion and to help prevent the wood from absorbing the paint unevenly. Finally, apply two coats of exterior-grade paint, allowing each coat to dry completely before applying the next. Choose affordable paint options such as exterior latex paint from a home improvement store; often, less expensive brands provide adequate coverage and durability. Consider using a roller for larger areas and a brush for trim and detail work.
Repairing Minor Damage to Outdoor Structures
Minor repairs to fences and decks can easily be handled with basic tools and materials. Patching holes in a fence typically involves cutting a piece of wood to fit the hole, applying wood glue, and securing it with screws or nails. For loose boards on a deck, check the underlying support structure. If the supports are sound, you may be able to re-secure the loose boards with longer screws. If the supports are damaged, they will need to be replaced. For larger repairs or structural issues, consider consulting a professional.
Necessary tools and materials for minor repairs include: a hammer, screwdriver, various sizes of screws and nails, wood filler, wood glue, sandpaper, measuring tape, saw (hand saw or circular saw), safety glasses, and work gloves. The specific materials will vary depending on the nature of the repair. For example, replacing a damaged fence board will require a new board of appropriate size and type.
Cleaning and Refreshing Existing Outdoor Furniture
Cleaning and refreshing existing outdoor furniture can be accomplished with readily available and affordable cleaning products. For wooden furniture, a mixture of mild soap and water is usually sufficient. Scrub gently with a brush and rinse thoroughly. For metal furniture, consider using a wire brush to remove rust and dirt before washing. Plastic furniture can be cleaned with a simple soap and water solution. Once clean, allow the furniture to dry completely. Consider applying a protective sealant to wooden furniture to extend its lifespan and enhance its appearance. For fabric furniture, spot clean stains as needed and consider using a fabric protector to repel future spills. Using a pressure washer (carefully) can also be an effective method for cleaning outdoor furniture, removing dirt and grime that might be difficult to reach otherwise.
Final Wrap-Up
Ultimately, achieving a beautiful and functional backyard doesn’t require a substantial financial investment. By embracing DIY projects, repurposing materials, and utilizing readily available resources, you can create a stunning outdoor oasis that reflects your personal style and enhances your enjoyment of the space. Remember, the key is careful planning, creativity, and a willingness to embrace simple yet effective solutions. With a little effort and imagination, the backyard of your dreams is within reach.


